The Total Darkness Misunderstanding
When someone asks me if digital night vision binoculars are worth the money, the very first thing I do is clarify what they mean by the word dark. I have watched this confusion play out more times than I can count at the optics counter. A customer buys a unit, takes it home, and brings it back the next day claiming it is defective.
I always asked how they tested it. Almost every time, the answer was the same. They took it into a windowless bathroom or a pitch-black basement, turned it on, and saw nothing but black static on the screen. In their mind, night vision should magically create an image out of nothing. But that is not how digital night vision binoculars work.
Field Note: The most common mistake I see is people expecting digital sensors to perform magic. A digital sensor is essentially a digital camera without an infrared filter. It needs existing ambient light to amplify, such as moonlight or the glow from distant streetlights. If there is zero light in the room, there is zero light to amplify. The screen will just be black.
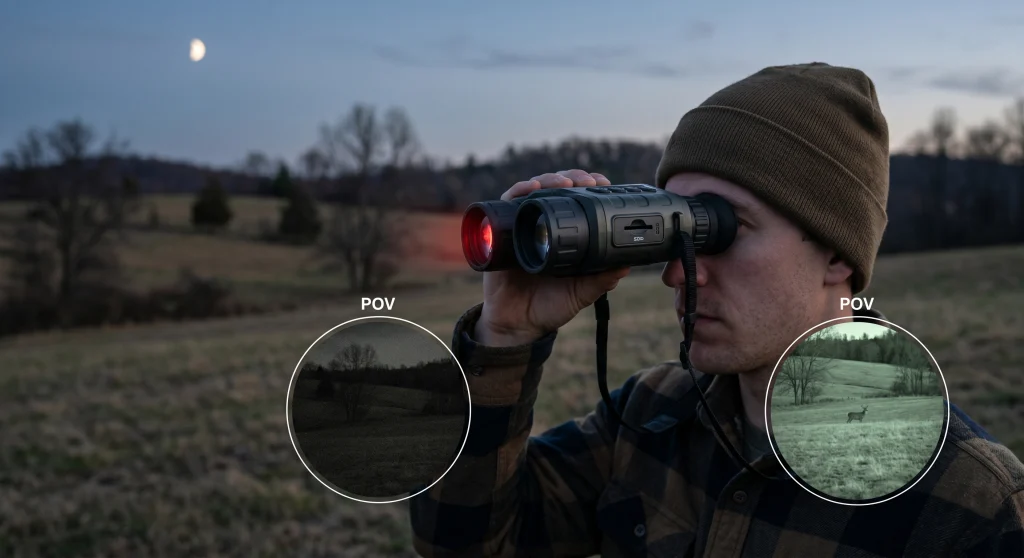
This is where the built-in infrared (IR) illuminator comes into play. To see in absolute darkness, you have to turn on this IR light. It acts like an invisible flashlight. The sensor can see it, but human eyes cannot. Once you understand this limitation, you start to see exactly where digital models excel and where they become a hindrance.
If you are still figuring out the basics of different types of binoculars, treating digital night vision like a specialized camera helps clarify exactly where it fits in your gear bag.
Managing the IR Illuminator in Practice
If you have ever read a digital night vision binoculars review that claims a product can see in total darkness, they are telling the truth. However, they are leaving out a crucial piece of context. They can only see in total darkness within the physical range of their infrared illuminator.
Think of the IR illuminator as a high-powered LED flashlight strapped to the front of your device. When you switch it on, it floods the area in front of you with infrared light. The CMOS sensor inside the binocular picks up that reflected light and translates it into the image you see on the screen. The problem is that flashlights have a finite range. A budget unit might have an IR beam that reaches 50 yards. A premium unit might push that to 200 or 300 yards. Anything beyond that invisible cone of light remains pitch black.
Using this IR light effectively takes a bit of practice. If you leave the IR illuminator on maximum power while looking at something 20 yards away, the reflection will completely overexpose the sensor. The animal will just look like a glowing white blob, and you will lose all detail.
Leaving the IR illuminator on maximum power at all times. This washes out close-up subjects, limits your field of view to a harsh spotlight effect, and immediately gives away your position to anyone else using night vision gear.
Relying on ambient moonlight whenever possible. Only turn the IR illuminator on when the ambient light drops too low, and actively adjust the power level to match the distance of your target.
There is also a major security consideration that many buyers overlook. While the IR beam itself is invisible to the naked eye, the actual LED emitter bulb usually has a faint, dull red glow when activated. Wildlife can sometimes notice this at close range. More importantly, to someone else looking through night vision optics, your IR beam looks like a massive, blinding spotlight. If you are using these for property security, understand that your invisible flashlight is highly visible to other night vision equipment.
Digital Night Vision vs Image Intensifier: Real World Trade-Offs
When comparing digital night vision vs image intensifier tubes, the physical experience of looking through the device is completely different. Traditional image intensifiers take physical photons of light, multiply them through a vacuum tube, and shoot them directly into your eye. You are looking at amplified reality at the speed of light.
With digital models, you are staring at a tiny LCD or OLED screen located inside the eyepiece. This creates display lag. Because a computer processor is rendering the image, there is a micro-second delay. If you try to pan quickly across a tree line to track a running animal, the image will smear and stutter. The screen simply cannot refresh fast enough to keep up with rapid movement.
| Feature | Digital Night Vision | Image Intensifier (Gen 1/2) |
|---|---|---|
| Technology | CMOS Sensor and LCD Screen | Photocathode Vacuum Tube |
| Total Darkness | Needs IR illuminator to see anything | Works in moonlight; fails only in absolute zero-light |
| Image Delay | Slight display lag, smears on panning | Zero delay, real-time light transmission |
| Daylight Use | Perfectly safe to use in bright sun | Sunlight will permanently burn the tube |
| Image Clarity | Flat screen, consistent edge-to-edge | Budget Gen 1 often has edge distortion (halos) |
Despite the lag, digital models solve two massive problems found in budget Gen 1 intensifiers. First, they can be used during the daytime. If you accidentally turn on a Gen 1 tube in bright sunlight, you will permanently destroy the optic. Digital sensors just show you a regular daytime image. Second, budget Gen 1 tubes often suffer from heavy edge distortion. The center of the image might be clear, but the outer edges blur and warp. Digital screens provide a flat, consistent image across the entire field of view.
The biggest downside to the digital setup is battery consumption. Image intensifier tubes require very little power to operate. A digital unit has to power a sensor, a processor, a bright screen, and an IR illuminator simultaneously. They eat batteries incredibly fast. A cold night can drain a set of alkaline batteries in just a couple of hours, making a USB power bank or extra cells a mandatory part of your kit.
The Video Recording Advantage
Because the image is already being processed digitally, saving it is incredibly easy. Nearly all digital units have a micro-SD card slot allowing you to record video and take photos. For wildlife watchers wanting to document nocturnal animals, or for property owners needing security footage, this feature alone often dictates the purchase.
Pro Tips: If you plan to record, you need to factor in your SD card speed. Budget models often compress video into older, bulky formats like AVI. Always use a high-speed card (Class 10 or UHS-I) to prevent the recording from freezing right as an animal walks into view.
Pay close attention to the sensor resolution versus the screen resolution. A manufacturer might advertise 4K video recording, but the tiny screen inside the eyepiece might only be 720p. Your recorded video will look incredibly sharp when you plug the SD card into your computer later, but your actual view in the field will be limited by that lower-resolution eyepiece screen. Knowing exactly what these recording features deliver in practice matters, because sensor size and IR illuminator strength are the two components that account for most of the price difference across the market.
Why the Price Range Is So Wide
If you browse the market, you will see a massive price gap. You can find models for $100 and others pushing well past $1,500. It is easy to wonder if the expensive ones are actually doing anything differently. From what I have seen, the extra money goes directly into specific capability upgrades.
First is the IR illuminator strength and sensor size. Cheap models use weak LEDs that struggle past 50 yards and small sensors that quickly break down into grainy static. Premium models use focused IR beams reaching 300 yards paired with larger sensors that handle low light far better.
Second is the type of magnification being advertised. To find the best digital night vision binoculars for your specific needs, you have to read the fine print about zoom.
- Optical Base Magnification: This is the true magnification provided by the physical glass lenses. It retains image quality and clarity.
- Digital Zoom: This just crops the center of the sensor and stretches the pixels to fit the screen. The more you zoom, the blockier and worse the image gets. Look for solid optical magnification and treat digital zoom as a backup.
At the absolute top end of the market, around $1,500 and up, you start seeing thermal fusion technology. This overlays a heat signature directly onto the digital image. If you want a deeper look at how that specific technology completely changes the game for finding hidden animals, check out our guide on thermal vs night vision binoculars.
Final Thoughts: Matching the Tech to Your Task
Digital night vision is highly effective as long as you match your budget to your actual environment. If your goal is checking a property line, occasional backyard wildlife watching, or navigating a dark, open trail, a $150 to $250 unit with a solid IR range covers this perfectly. It will require some active management of the IR beam, but the value is hard to beat.
If you are doing extended nocturnal wildlife documentation where video quality and smooth panning matter, you need to step up to the $400 to $600 tier to get better sensor resolution and optical magnification. Finally, if your main objective is hunting in dense brush where detecting hidden animals is critical, you should skip digital entirely and look into thermal optics instead.
FAQs
🔦 Do digital night vision binoculars work in pitch black?
No, not on their own. In pitch-black conditions with zero ambient light, the screen will be dark. You must turn on the built-in infrared (IR) illuminator to see anything, which limits your vision to the exact range of that IR beam.
☀️ Can you use digital night vision during the day?
Yes. Unlike traditional image intensifier tubes that can be permanently ruined by bright sunlight, digital sensors are safe to use during the day. They function exactly like a standard digital video camera in daylight.
🔋 How long do the batteries usually last?
Battery life is typically short, often ranging from 2 to 5 hours depending on usage. Running the screen at maximum brightness and keeping the IR illuminator on its highest setting will drain alkaline batteries very quickly.
📸 Can digital night vision take pictures?
Yes. Most models include a micro-SD card slot, allowing you to record video footage and capture still images directly from the sensor. This is a major advantage over traditional analog night vision.